
Image optimization on mobile devices like iOS and Android has become a standard feature designed to save space and bandwidth. It is typically selected by default on most mobile devices (including tablets). This technology works by storing a lower quality version of your images on the device while optionally uploading the original, high-quality versions to the cloud. When sharing these images, the low-quality versions are often sent, not the original ones. This is particularly problematic for tasks requiring high fidelity images, such as website and graphic design. For businesses like Breeder Designs, where precision and quality in imagery are paramount, ensuring that images retain their original quality before being sent to a us is crucial. This guide will explain how to turn off image optimization on both iOS and Android devices to maintain the integrity of your images for professional use.
Disabling Image Optimization on iOS Devices
For Latest iOS Versions:
Open Settings: Navigate to the settings app on your iOS device.
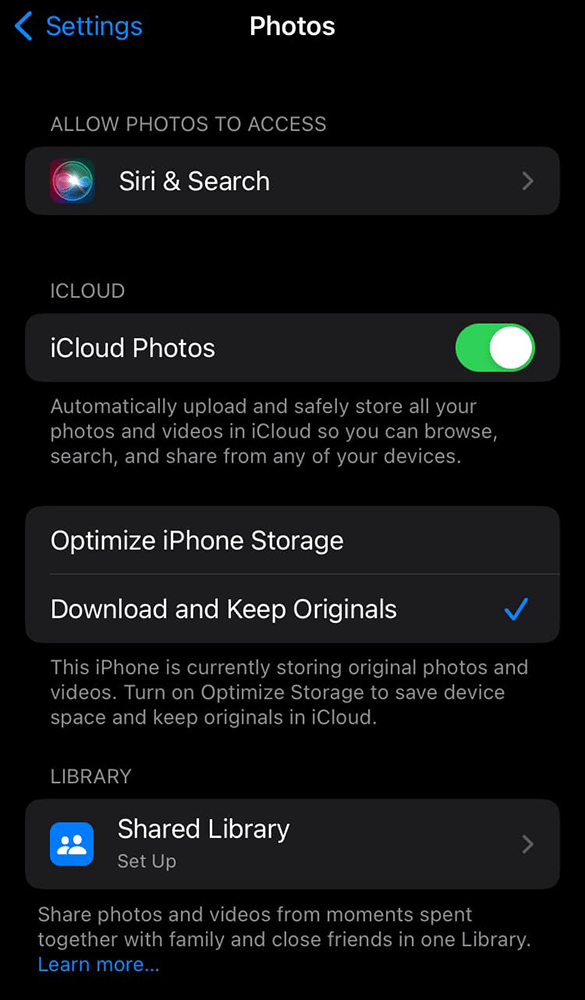
Photos Settings: Scroll down and tap on “Photos”.
Disable iCloud Photos: If enabled, iCloud Photos automatically optimizes storage on your device. You can turn this off by selecting “Download and Keep Originals”. This ensures all photos remain in their original quality on the device.
Optimize Storage Option: In some versions, you might find an “Optimize iPhone Storage” option. Make sure it’s not selected.
Additional Tips
Ensuring your device has ample storage to accommodate high-quality images is important. High-resolution photos and videos can quickly consume storage space, impacting not only the performance of your device but also its ability to store new content. It’s advisable to regularly review your storage usage and manage files accordingly, removing unnecessary items or transferring them to external storage (such as your computer or a cloud service). Additionally, the importance of manually backing up original photos cannot be overstated. Whether it’s to an external hard drive, a cloud service, or both, having a backup strategy in place safeguards your images against loss. This practice is especially important for images intended for professional use, such as website design, where the highest quality is often required. Android devices vary significantly in software versions and manufacturer customizations, making the process to disable image optimization less uniform. However, most follow a similar path:
For Google Photos:
Open Google Photos App: Locate and open the Google Photos app.
Settings Access: Tap on your profile picture or initial at the top right, then select “Photos settings”.
Back Up & Sync: Find and tap on “Back up & sync”.
Upload Size: Here, you’ll see options for upload size including “High quality” (compressed) and “Original”. Ensure “Original” is selected to prevent any compression.
Device-Specific Settings
The process of disabling image optimization can vary significantly across Android devices due to differences in software versions and manufacturer customizations. Beyond the general settings accessible through apps like Google Photos, many Android devices offer additional options within their camera or gallery apps that can impact image quality. Diving into these settings can reveal optimization features that, when disabled, ensure your photos retain their original fidelity. For instance, some devices may include an option to save photos in a RAW file format, providing you with unprocessed image files for maximum editing flexibility. Furthermore, the “Data Saver” mode found in many Android devices can affect not only your browsing experience but also how images are compressed and displayed. Disabling this mode while uploading or sharing images can prevent unwanted compression, preserving the quality of your photos. By exploring and adjusting these device-specific settings, you can further refine how your images are handled, ensuring they meet the standards required for your web design projects.
Incorporating these expanded sections into the article enriches its content, providing readers with a deeper understanding of how to manage image optimization settings effectively on their iOS and Android
Re-enabling Image Optimization
Once you’ve successfully sent the high-quality images to your web designer, you might consider re-enabling the image optimization settings on your device. Doing so can help you conserve storage space and manage data usage more efficiently. For iOS users, this can be easily done by going back into the Photos settings and choosing to optimize iPhone storage. Android users, depending on their device, can revert the changes made in Google Photos or other relevant settings to resume optimization. It’s a practical approach for maintaining device performance and storage management without compromising on the quality of images shared for professional purposes. Balancing these settings according to your current needs ensures that your device functions optimally while still allowing you to switch to high-quality modes when necessary. devices.
Getting the Best Results For Design Work
For web design companies like Breeder Designs, where showcasing high-quality images is essential, understanding how to disable image optimization on your mobile devices is crucial. By following the steps outlined for both iOS and Android devices, you can ensure that the images you send and upload retain their original quality, suitable for professional graphic work and website design. Always check for any device-specific settings that may also impact image quality and adjust accordingly. This proactive approach will help maintain the standard of your visual content, reflecting the high quality of service your business strives to provide.

